How to Screenshot on Windows Using Keyboard Shortcuts
One of the quickest ways to take a screenshot on Windows is by using keyboard shortcuts. These shortcuts are built into the Windows operating system and provide a fast and efficient way to capture your screen without the need for additional software.
1. Print Screen (PrtScn) Key
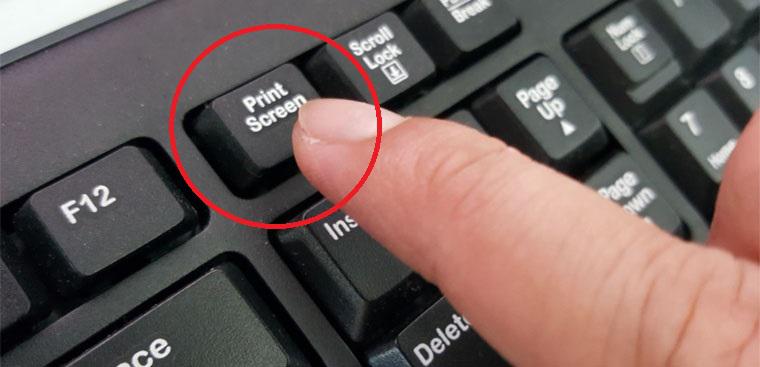
The simplest method is to press the PrtScn key on your keyboard. This captures the entire screen and saves it to your clipboard. You can then paste the image into an image editor, like Paint, or directly into a document.
2. Alt + Print Screen
To capture only the active window, press Alt + PrtScn. This combination captures the currently focused window, making it ideal for capturing a specific application window without including the entire desktop.
3. Windows + Print Screen
For those who need an immediate save, press Windows + PrtScn. This shortcut captures the entire screen and automatically saves the image in the Screenshots folder within the Pictures directory.
How to Screenshot on Windows Using Snipping Tool
The Snipping Tool is a built-in Windows application that offers more flexibility than keyboard shortcuts. It allows you to capture specific areas of your screen and offers basic editing tools.
4. Using the Snipping Tool
- Open the Snipping Tool by searching for it in the Start menu.
- Click New to begin a new screenshot.
- Select the area you wish to capture.
- Save or edit the screenshot as needed.
The Snipping Tool provides several snip types, including free-form, rectangular, window, and full-screen snips, making it versatile for different needs.
5. Using the Snip & Sketch Tool
In Windows 10 and 11, Microsoft introduced Snip & Sketch, an upgraded version of the Snipping Tool. To use it:
- Press Windows + Shift + S to bring up the snipping toolbar.
- Choose from the rectangular, freeform, window, or full-screen options.
- Your selection is copied to the clipboard, and a notification will appear. Click it to open the Snip & Sketch app for further editing or saving.
How to Screenshot on Windows Using Third-Party Tools
If you need more advanced features, third-party screenshot tools provide extensive options, such as scrolling captures, cloud storage, and advanced editing.
6. Greenshot
Greenshot is a free, open-source screenshot tool that offers more functionality than Windows’ built-in options. It allows for full-screen, window, and region captures, and it includes annotation tools. You can even upload screenshots directly to cloud services like Dropbox.
7. Lightshot
Lightshot is another popular tool, known for its simplicity and speed. It offers easy-to-use editing features and allows you to share screenshots directly via a unique URL.
8. Snagit
Snagit is a premium screenshot tool with a wide range of features, including video recording, panoramic capture, and advanced image editing. It’s ideal for professionals who need more than just basic screenshot capabilities.
How to Screenshot on Windows for Specific Needs
Depending on what you’re trying to capture, there are some specific methods that might work best for you.
9. Capture a Specific Area
If you only need to capture a specific part of your screen, the Snipping Tool or Windows + Shift + S are your best options. Both allow you to click and drag to select a particular area.
10. Screenshot an Entire Web Page
Capturing an entire web page that scrolls beyond the visible screen requires a tool like Snagit or a browser extension such as Full Page Screen Capture for Chrome. These tools allow you to scroll and capture the full length of a webpage.
FAQs
How can I take a screenshot without using any tools?
Use the Print Screen (PrtScn) key to capture the entire screen. Press Alt + PrtScn to capture only the active window.
Where are my screenshots saved on Windows?
Screenshots taken using Windows + Print Screen are saved automatically in the Screenshots folder inside the Pictures directory.
see more on our blog


